# EZR23T - 4G LTE Router

The **EZR23T** series 4G router has an LTE mobile modem and dual SIM card slots. Insert a SIM card to access 4G mobile data networks. It provides mobile internet connection on Ethernet and 2.4G WiFi hotspots for homes, offices, appliances, and industrial machines.

The EZR23T modem is an upgraded version of the [EZR23 router](https://indoor.router.works/v/ezr23/), now featuring an additional LAN port and an extra PoE input port to expand wired networking more easily.

<figure><img src="/files/JWon19oHdn13iDiUUNrC" alt=""><figcaption><p>4G LTE Router Woking Principle</p></figcaption></figure>

The EZR23T indoor 4G router has a powerful 27dBm 2.4GHz Wi-Fi booster inside with transmission speeds of up to 300Mbps. The Wi-Fi signal can cover 100-200 yards in radius in the open space.

Include innovative high-gain paddle 4G antennas. It is ideal for providing internet in homes, offices, shops, restaurants, caravans, and industrial applications.


# Hardware Overview

Indoor 4G router is an industrial-grade cellular gateway designed for use in the indoor environment and rugged industrial deployments.

{% content-ref url="/pages/0QRnjW871XYzQ5bCI3F8" %}
[Package Contents](/hardware-overview/package-contents)
{% endcontent-ref %}

{% content-ref url="/pages/dC5HBELn9pPHKjyCmdqI" %}
[Physical Interfaces](/hardware-overview/physical-interfaces)
{% endcontent-ref %}

## Hardware Specifications

**ROUTER MOTHERBOARD**

<table><thead><tr><th width="223">Subjects</th><th>Specifications</th></tr></thead><tbody><tr><td>CPU Chipset:</td><td>Qualcomm Atheros QC9531</td></tr><tr><td>Clock Speed:</td><td>650MHz</td></tr><tr><td>System Memory:</td><td>128Mbyte</td></tr><tr><td>Flash Memory:</td><td>SPI FLASH 16MB</td></tr><tr><td>SIM Card Slot:</td><td>Double Nano-SIM Cards (12.3x8.8mm)</td></tr><tr><td>RJ45 Ports:</td><td>10/100Mbps</td></tr><tr><td>Indicator:</td><td>System / Wi-Fi / SIM1 / SIM2</td></tr><tr><td>Temperature:</td><td>Working: -40 to +80°C<br>Storage: -50 to +90°C</td></tr><tr><td>Humidity:</td><td>10%~90% RH</td></tr><tr><td>Measurement:</td><td>Router: 230x175x70 mm / 980 gram</td></tr></tbody></table>

#### RF ANTENNAS

<table data-header-hidden><thead><tr><th width="228">Item</th><th>Value</th></tr></thead><tbody><tr><td>2 x 4G LTE Antenna:</td><td><p>Frequency: 700~960 / 1710~2170 / 2300~2700MHz</p><p>Peak Gain: 3~5dBi / V.S.W.R.: ≤ 3.0</p><p>Size: 209 x 42 mm / Material: ABS</p></td></tr><tr><td>2 x Wi-Fi antenna:</td><td><p>Frequency: 2400~2500MHz</p><p>Gain: 4~5dBi / V.S.W.R.: ≤ 1.92</p><p>Size: Ø13 x 201 mm / Material: TPEE</p></td></tr><tr><td>Connector:</td><td>SMA Male (Not RP)</td></tr><tr><td>Polarization:</td><td>Vertical</td></tr><tr><td>Impedance:</td><td>50 Ω</td></tr><tr><td>Max Input power:</td><td>10 Watt</td></tr><tr><td>Temperature:</td><td>Working: -0° to 50° Celsius</td></tr></tbody></table>

#### WIFI HOTSPOT

<table data-header-hidden><thead><tr><th width="230">Item</th><th>Value</th></tr></thead><tbody><tr><td>Wi-Fi standards:</td><td>IEEE 802.11 a/b/g/n<br>IEEE 802.3 and IEEE 802.3u</td></tr><tr><td>MIMO Wi-Fi:</td><td>2T2R MIMO (multiple-input multiple-output)</td></tr><tr><td>Transmission rate:</td><td>300Mbps</td></tr><tr><td>Frequency:</td><td>2.4GHz - 2412~2484 MHz</td></tr><tr><td>Channel:</td><td>1~13</td></tr><tr><td>Bandwidth:</td><td>20/40 MHz or Auto</td></tr><tr><td>Output power:</td><td>802.11b: 27±2dBm<br>802.11g: 25±2dBm<br>802.11n: 23±2dBm</td></tr><tr><td>Wi-Fi mode:</td><td><p>11b / 11g / 11n only</p><p>11b/g mixed or 11b/g/n mixed</p></td></tr><tr><td>Concurrent user:</td><td>57 users</td></tr></tbody></table>

#### DC ADAPTER

<table data-header-hidden><thead><tr><th width="233"></th><th></th></tr></thead><tbody><tr><td>Input:</td><td>AC 100~240Volt 50/60Hz 0.5Amps</td></tr><tr><td>Output:</td><td>DC 12Volt 2.0Amps</td></tr><tr><td>Measurement:</td><td>75.7*47.2*31.3mm / 140g<br><em>Depending on the AC plug</em></td></tr><tr><td>AC Plug:</td><td>EU/GB/US/AU standard available<br><em>Ship depends on the destination</em></td></tr><tr><td>DC Jack:</td><td>Outer Ø5.5mm / Inner Ø2.1mm / Length 10mm</td></tr><tr><td>DC Wire:</td><td>Length 1200mm</td></tr><tr><td>Protection:</td><td>Short circuit, overload, and over-voltage</td></tr><tr><td>Certification:</td><td>CE / UL / FCC / DOE / ERP / GS / BS / SAA</td></tr></tbody></table>

**ROUTER FIRMWARE**

<table data-header-hidden><thead><tr><th width="235">Subjects</th><th>Functions</th></tr></thead><tbody><tr><td>Router Firmware:</td><td>OpenEzen Series - EV3xxx</td></tr><tr><td>Log in:</td><td>IP address: 192.168.20.1<br>Password: root</td></tr><tr><td>Built-in Protocols:</td><td><strong>Mobile:</strong> Mobile-Data (QMI) and PPP<br><strong>WAN:</strong> PPPoE / DHCP / Static<br><strong>LAN:</strong> Static with DHCP server (IPv4 &#x26; IPv6)</td></tr><tr><td>VPN Tunnel:</td><td>PPTP, L2TP, IPSec, OpenVPN, and WireGuard</td></tr><tr><td>Cloud Management:</td><td>Traversal Cloud and Ezen-Cloud (Optional)</td></tr><tr><td>Security:</td><td>Anti DDoS, SPI firewall, IP/Mac/Domain filter, IP &#x26; Mac bind</td></tr><tr><td>Port Forward:</td><td>Virtual server, port triggering, UPnP, DMZ</td></tr><tr><td>Computer:</td><td>Windows / Mac / Linux / etc</td></tr></tbody></table>


# Package Contents

Introduction to the components included in the 4G router package.

After receiving your router, please check that all items below are in the box. If any components are missing or damaged, please get in touch with our support team immediately.

1 x EZR23T router\
2 x 4G paddle antenna\
2 x Wi-Fi whip antenna\
1 x 1-meter LAN cable\
1 x 12V 2A power adapter\
1 x SIM pin

*Note: The AC Plug depends on the destination country.*

<figure><img src="/files/Cq1rXkiGLXzX706dznX7" alt=""><figcaption><p>4G Router Package Contents</p></figcaption></figure>

{% hint style="info" %}
Please retain the original shipping box and packaging for at least 2-4 weeks after receiving your order. We recommend using the shipping box to store power adapters, antennas, cables, manuals, and other included parts when not in use. This helps ensure all pieces remain organized and protected in one place. The box is also helpful if transporting your router setup to another location.
{% endhint %}


# Physical Interfaces

Get known of the physical interfaces on the 4G router.

## Sockets & Interfaces

The 4G Router features multiple SMA-female antenna ports to connect the included 4G paddle and Wi-Fi whip antennas. The antenna sockets are SMA-female connectors. 4G antenna sockets are marked "Mobile. Wi-Fi sockets are marked "Wi-Fi".

<figure><img src="/files/RVgUeUTxhMGcXfJwPxU7" alt=""><figcaption><p>Indoor 4G Router - Physical Interfaces &#x26; Antenna Ports</p></figcaption></figure>

## Indicators

There are four indicators on the router. From top to bottom, the left side is System & Wi-Fi, and the right is SIM1 & SIM2. Below are the indicator descriptions.

<table><thead><tr><th width="125.33333333333331">Indicator</th><th width="93">Status</th><th>Description</th></tr></thead><tbody><tr><td><strong>System</strong></td><td>Green</td><td>This light indicates that the router is receiving power. If it's lit solid green, then the router has booted successfully.</td></tr><tr><td></td><td>Flash</td><td>The router system is booting up. The system indicator flashes while resetting or flashing the firmware.</td></tr><tr><td></td><td>Off</td><td>No light at all indicates that the router is not receiving power. Check the PoE socket connected to the motherboard and check the PoE adapter. You might need to test an alternate power socket if the router doesn't power on.</td></tr><tr><td><strong>Wi-Fi</strong></td><td>Green</td><td>This light indicates that the modem is sending a Wi-Fi signal. If the light is green, you should be able to see and connect to the Wi-Fi network.</td></tr><tr><td></td><td>Flash</td><td>If you are connected to the Wi-Fi hotspot, it will flash green to indicate data going to and from the router. If the router is connected to another Wi-Fi hotspot (Wi-Fi relay), it will also flash because it has the data flow.</td></tr><tr><td></td><td>Off</td><td>If it's off, your router no longer sends a Wi-Fi signal. You can log in to the router admin and turn on the Wi-Fi master hotspot.</td></tr><tr><td><strong>SIM1</strong>/<strong>2</strong></td><td>Green</td><td>These lights indicate which SIM card the router is using. It uses the SIM1 by default. You can change to use SIM2 on the router admin.</td></tr></tbody></table>


# SIM Card & Power

Step-by-step tutorial on inserting a SIM card and booting up the router.


# Choose Location

Good mobile signal quality is fundamental to getting a stable and fast internet connection over the mobile network. Please choose a location for the 4G router that has a good signal reception.

### Mobile Networks

There are various mobile networks, 2G, 3G, 4G, and 5G NR. Please take note of the signal bars and the symbol in the status bar of the mobile phone and compare them with the chart below.

<table><thead><tr><th width="150">Symbol</th><th width="314">Mobile Networks</th><th>Internet Speed</th></tr></thead><tbody><tr><td>5G NR</td><td>Fifth generation mobile network</td><td>Up to 10 Gbps</td></tr><tr><td>4G (LTE)</td><td>Fourth generation or Long term evolution<br>also known as LTE or WiMax</td><td>Up to 1 Gbps</td></tr><tr><td>3G</td><td>Third Generation<br>also known as UMTS / WCDMA / CDMA2000</td><td>Up to 2 Mbps</td></tr><tr><td>2G</td><td>GPRS <br>(General Packet Radio Service)</td><td>Up to 64 Kbps</td></tr><tr><td>No Symbol</td><td>If signal bars get more than 1 bar<br>you can use voice call</td><td>No</td></tr></tbody></table>

### &#x20;Signal Strength

We should input a "Fair" signal level for the 4G router. Typically speaking, 3-5 bars indicate a good signal, while 1-2 bars indicate a poor signal. No bars mean no 4G signal detected.

You can run a basic test on a mobile phone. Insert the SIM card used on the router on a mobile phone. Disable Wi-Fi on the mobile phone and go around to check its network type and signal bars. Then, choose a location with strong and stable signal reception.&#x20;

The below chart shows targeted signal quality values for 4G-LTE and 3G networks.

<figure><img src="https://2281776451-files.gitbook.io/~/files/v0/b/gitbook-x-prod.appspot.com/o/spaces%2FgV6nqomki285by8oRjoy%2Fuploads%2Fprr5DZhVQWNpqiv0Riqt%2Fimage.png?alt=media&#x26;token=2c07c988-314a-43d2-877e-06b68e131dcb" alt=""><figcaption><p> Signal Quality Chart</p></figcaption></figure>

{% hint style="info" %}
The numerical value of 2G and 3G networks is RSSI standard.&#x20;

The LTE network is RSRP standard. RSRP means Reference Signal Receive Power.

The signal values are negative numbers. A number that is closer to zero means a stronger signal. For example, -90 dB is more robust than -100 dB.
{% endhint %}


# Install Antennas

The 4G router uses 2x2 MIMO antennas on both mobile and Wi-Fi connections.

## Antenna Sockets

Please check the chart and image below about which antenna goes to which socket.

<table><thead><tr><th width="215">Antenna Sockets</th><th>Antenna Marks</th></tr></thead><tbody><tr><td>Mobile *Main</td><td>4G paddle antenna (Main Port)</td></tr><tr><td>Mobile *DIV</td><td>4G paddle antenna (Alternative Port)</td></tr><tr><td>Wi-Fi</td><td>Either Wi-Fi whip antenna</td></tr></tbody></table>

The 4G and Wi-Fi antennas have printed marks on their connectors to indicate which ports they attach to for proper configuration. Be sure to connect the antennas to their correctly labeled antenna sockets on the router, as shown in the below image.

## Install Antennas

To install the antennas, twist the antenna connectors clockwise onto the router until securely fastened. Only twist the connectors—do not excessively turn the antenna bodies, as it could damage the antenna pin or internal wiring.

All the antennas have vertical polarization. Ensure all antennas remain upright vertical once installed on the router for the best possible reception and range.

<figure><img src="/files/vtiJlNYQw9gReqNOee3w" alt=""><figcaption></figcaption></figure>

{% hint style="info" %}
The flat panels of the 4G paddle antennas have a higher performance. Please adjust the paddle direction towards the outside or signal source to receive a better signal.
{% endhint %}

{% hint style="warning" %}
To ensure optimal performance of your 4G router, position the device away from potential sources of radio frequency interference, such as microwave ovens, radio transmission equipment, and high-power electrical appliances.
{% endhint %}

##

## Upgrade Antenna

When you have a weak signal reception, please consider upgrading the 4G mobile antenna with a higher-gain antenna. The MIMO panel antenna can point towards the cell tower and receive stronger 4G signals.

To connect to the other mobile or WiFi antennas, make sure these antennas have the standard SMA-male connectors. You can use both a MIMO and a single-polarized antenna on the router. If it's a single-polarized antenna, please connect it to the mobile main socket on the left side.&#x20;


# Insert A SIM Card

The 4G router uses Nano (4FF) SIM card to connect to mobile internet networks.

## Nano SIM Card

Please use Nano-SIM cards (12.3x8.8mm) on the 4G router.&#x20;

Please use an activated Nano SIM card in the G router. If you are going to use a new SIM card, please follow the instructions from the mobile carrier to activate the SIM card.

<div align="left"><figure><img src="https://2281776451-files.gitbook.io/~/files/v0/b/gitbook-legacy-files/o/assets%2F-LvFmeL2Pv0EF2-7nON9%2F-LxQ1c6Ik5UlOWOQ9j5L%2F-LxZoKJUeZsSpLaRrIH9%2Fimage.png?alt=media&#x26;token=c52857ea-ea77-4650-8459-2cb70c7a9143" alt="" width="375"><figcaption></figcaption></figure></div>

{% hint style="warning" %}
Please always turn off the power while inserting or removing the SIM card.
{% endhint %}

{% hint style="info" %}

### Clean the SIM Card

If the 4G router does not recognize the SIM card or gets an error message such as "SIM card is unavailable,"

Firstly, please verify if the SIM card was inserted correctly.

Secondly, please check if the SIM card is clean, especially the golden contacts.

Finally, if there is dust/dirt/oil on the SIM card, you can wipe it to clean it.
{% endhint %}

## &#x20;<a href="#insert-sim-cards" id="insert-sim-cards"></a>

## Insert SIM Cards <a href="#insert-sim-cards" id="insert-sim-cards"></a>

1. Turn off the power before inserting SIM cards.
2. Use the included SIM pin to push the pinhole gently until the SIM card holder pops out.
3. Put the primary SIM card in the first SIM#1 slot. Ensure the notch is in the inside direction and the pins face down. There is only one correct way to settle the Nano SIM card into the cardholder.
4. Carefully reposition the SIM card holder in the slot and push it back gently.

<figure><img src="/files/VK3mKm6ZdwuF7UDjdVt6" alt=""><figcaption></figcaption></figure>


# Power Supplies

The 4G router uses a 12Volt DC power adapter. Please use the correct voltage and current if using other power sources.

## DC Power Adapter

The router includes a default AC/DC power adapter. Plug the AC connector into a 110-240V electrical outlet, and connect the DC plug to the DC socket on the router. The router will power on automatically when DC power is connected.

## Alternative Power Sources

Higher voltages and currents can damage the router, and insufficient voltages and currents might not be able to power up the router or reduce the operating performance.

### DC Power

The DC socket could take a wide range of 9\~48Volt DC power. Do not overload it! The typical DC power is 12Volt 2Amps. The DC jack should be Ø5.5 x 10mm, and the inner pin should be Ø2.1mm.

### PoE Power

You can use an IEEE802.3af/at standard PoE injector or PoE switch to input electric power on the "PoE & WAN" and "PoE & LAN" ports. They activate the WAN and LAN connections through the PoE LAN cable.


# Firmware

Config the 4G router firmware system.


# Login Router

Connect a phone or computer to the indoor 4G router via Wi-Fi or Ethernet, then login to the router's admin panel.

## Connect to Router

After connecting to the electrical outlet via the DC power adapter, the router will boot up and turn on the Wi-Fi hotspots in 2\~3 minutes.&#x20;

### Wi-Fi Connection

After the router successfully boots up, you can join the Wi-Fi hotspot **Cellular-WiFi-xxxxxx**. The last six characters are the Wi-Fi module's Mac address.

The default Wi-Fi hotspot is **non-encrypted** (has no password). Connect to this Wi-Fi hotspot on a computer, laptop, or smartphone.

### LAN Connection

You can connect a laptop, computer, or another router to the "**LAN**" or "**PoE & LAN**" port on the 4G router. When connecting to a secondary router, connect to the WAN port on the secondary router.&#x20;

### IP Settings

{% tabs %}
{% tab title="DHCP" %}
The DHCP server is enabled on the 4G router's LAN ports.&#x20;

DHCP dynamically assigns the IP address, gateway, domain name server, and other information to the connected devices. Below are the default DHCP settings.

Router Address (Gateway): 192.168.20.1\
Subnet Mask: 255.255.255.0 (24)\
DHCP IP Pool: 192.168.20.100\~254\
DHCP Lease Time: 12 Hours

The terminal will automatically obtain the local IP address if turned on in DHCP client mode. If the terminal uses the static IP mode, please follow the guidance below to set up the IP address.
{% endtab %}

{% tab title="Static IP" %}
Configure TCP/IP on your connected devices, and ensure the IP address is within 192.168.20.100\~249. The subnet mask should be 255.255.255.0. The router address should be 192.168.20.1.&#x20;

On iPhone: Goes to Settings > Wi-Fi > Advanced \
On Android phone: Goes to Settings > WLAN > Advanced \
On Mac: Goes to System preferences > Network > Wi-Fi > Advanced > TCP/IP

**On Windows:**&#x20;

Goes to Start > Control panel > Network and internet > Change adapter setting (on the left window panel) > Local area connection > Properties (right click) > TCP/IPv4 (Internet Protocol version 4) > Properties > General.

Choose Obtain an IP address automatically and Obtain DNS server address automatically. Click OK to exit settings.&#x20;

Click OK again in the Local area connection properties to apply the new configurations.
{% endtab %}
{% endtabs %}

<div align="left"><figure><img src="/files/VuBwqETmSba7tsxWXev6" alt="" width="375"><figcaption><p>Login Router http://192.168.20.1/</p></figcaption></figure></div>

## Login Router

After connecting your smartphone or computer to the router, open a web browser and type **<http://192.168.20.1/>** in the URL address bar. Click the "**Login**" button to log in to the router admin.

{% hint style="info" %}
If unable to access router admin with 192.168.20.1, please clear your browser's cache or use the complete URL path below. 🔗<http://192.168.20.1/cgi-bin/luci>
{% endhint %}

{% hint style="warning" %}
The default URL prefix is **http\://** instead of https\://.
{% endhint %}


# System Admin

Here are the basic system settings that should be changed on the router.

After accessing the router admin panel, navigate to ***"System > System"*** from the top menu. We will go to the System Properties page below.

## System Properties

### Time Zone

Under the General Settings tab, click the **"Sync with browser"** button to sync the time. \
The router will automatically sync with the time server after being connected to the internet.

Choose the correct time zone, then click the **"Save & Apply"** button on the bottom right corner to save your new settings.

### Host Name

You can customize the **"Hostname"** to rename the router, which displays on the top left-side corner.

## Administration

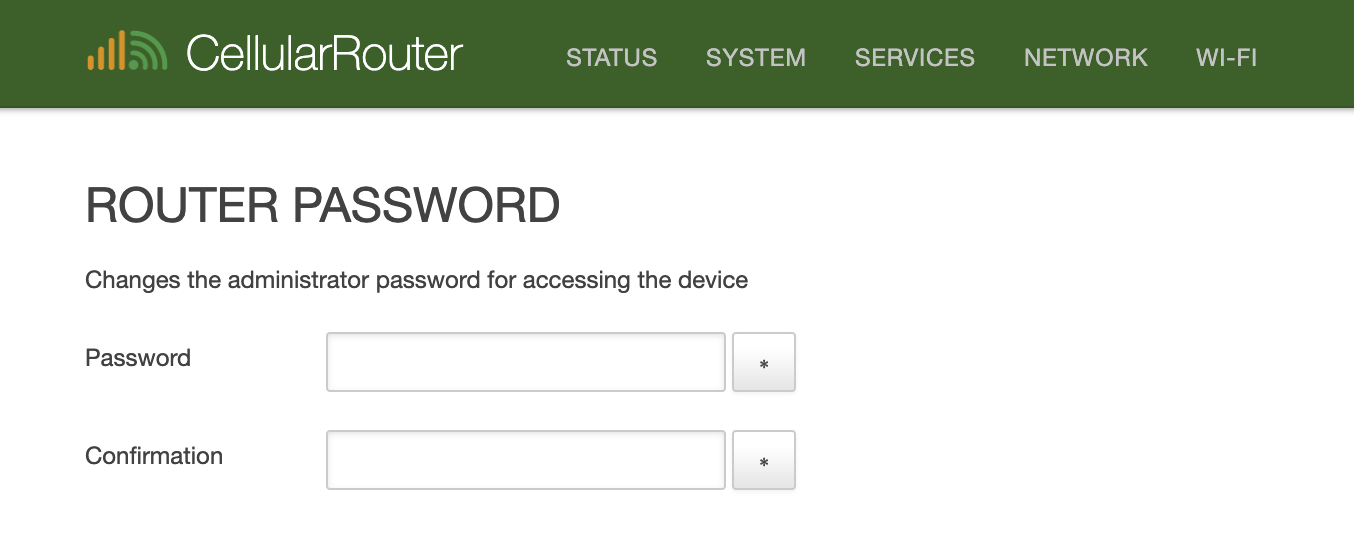
Go to ***"System > Administration,"*** input the new custom router password twice in the section of *"Router Password,"*  then click the **"Save & Apply"** button on the bottom right corner.

<div align="left"><figure><img src="https://2281776451-files.gitbook.io/~/files/v0/b/gitbook-x-prod.appspot.com/o/spaces%2FgV6nqomki285by8oRjoy%2Fuploads%2FvvGCpreUuXfWbGWNseCr%2FEZR24-4G-Router-Password.png?alt=media&#x26;token=96863ca4-808c-46a2-901a-8ed90029e256" alt="" width="375"><figcaption></figcaption></figure></div>

{% hint style="danger" %}
It is critical to keep the administrator password for your router recorded in a secure location. If this password is lost or forgotten, the only way to regain access to the router dashboard and configuration settings is to perform a hard reset of the firmware, which will erase all custom configurations and return the device to factory default settings.
{% endhint %}


# Network Interfaces

The network interfaces on the 4G LTE router.

## Interface Overview

After logging in to the router, go to **Network > Interfaces** to view and manage the network interfaces.

The brief information of each interface is listed under the second column, including MAC address, Rx (Download), Tx (Upload), Uptime, and IP address.&#x20;

<figure><img src="/files/kH2v43sdJMrBJauFhgVn" alt=""><figcaption><p>Indoor 4G Router - Interface Overview</p></figcaption></figure>

{% hint style="info" %}

* The color on each interface does not correspond to its connection status.
* Rx/Tx indicates the real-time data stream instead of the internet speed.
  {% endhint %}

***

## Brief Introduction

The indoor 4G router has several network interfaces, as shown in the image above. All of these interfaces work together to connect the router to local devices via Ethernet or WiFi, as well as to the internet through the cellular network.

It is important not to "Stop" or "Delete" any interfaces unless you know their functions.

### Guest (wlan0-1)

The Guest interface is isolated from the main network (192.168.20.100\~249). It uses a separate subnet, 192.168.100.100\~249, and is bound to the Guest WiFi hotspot. This interface will be activated after enabling the Guest WiFi under "Network > Wireless."

### LAN (bar-lan)

This is the interface of the leading local intranet network. It is assigned to the physical RJ45 port **eth0**. Refer to the below section to configure the local intranet networks.

{% content-ref url="/pages/aOaQqkaQUdm0Z9bg8VK4" %}
[Local Networks](/firmware/network-interfaces/local-networks)
{% endcontent-ref %}

###

### Mobile (wwan0)

The Mobile interface displays information and controls related to the 4G cellular data connection.

**Uptime:** Shows how long the mobile data connection has been active.\
**RX/TX:** Displays the real-time data usage flowing through the mobile modem.\
**IPv4:** The mobile IP address assigned by the mobile carrier for internet connectivity.

By clicking the "**Edit**" button, you can configure settings like the mobile protocol, APN, SIM card slot, PIN code, and more. Please refer to the [Mobile Modem settings](/firmware/mobile-modem) section for details.

The router should establish a mobile data connection when powered on. Using the Connect and Stop buttons, you can manually connect or disconnect the mobile broadband. Once successfully connected to a mobile network, the RX/TX counters will show live data traffic, and an IPv4 address will be assigned.

{% content-ref url="/pages/QUfndxIUjwXdrI2GRKFJ" %}
[Mobile Modem](/firmware/mobile-modem)
{% endcontent-ref %}

###

### WAN (eth0)

The WAN port is bound to the **eth1** RJ45 port, marked "PoE & WAN" on the enclosure.

DHCP client protocol It is enabled on the WAN interface and can automatically obtain the IP address after being connected to the LAN port on another internet router or modem. You can use the PPPoE protocol when linking to a landline modem and turning on the bridge mode.


# Local Networks

Configure the LAN interface to set up local intranet networks.

{% hint style="danger" %}
Do not `stop` or `delete` the **LAN (bar-lan)** interface is the DHCP server of local networks and the cornerstone of Ethernet and Wi-Fi functions.
{% endhint %}

## **Router IP Pool**

To modify the DHCP configuration, log in to the router admin and go to "Network > Interfaces," then click the "**Edit**" button on the row of the "**LAN**" interface.

### **Router IP Address**

Under the tab of "General Setup", you can modify the router IP address, netmask, gateway address, broadcast address, and custom DNS servers.

<table><thead><tr><th width="171.33333333333331">Field</th><th width="148">Default</th><th>Description</th></tr></thead><tbody><tr><td>IPv4 address</td><td>192.168.20.1</td><td>The IP address that the router uses on the LAN network.</td></tr><tr><td>IPv4 netmask</td><td>255.255.255.0</td><td>Netmask is used to define how "large" the LAN network is.</td></tr><tr><td>IPv4 broadcast</td><td>N/A</td><td>DHCP clients use broadcast to find and send requests to their respective servers.</td></tr></tbody></table>

### **DHCP Server**

Scroll down and find the section of "DHCP server" settings. Under the "General Setup" tab, you can modify the DHCP IP pool and DHCP lease period.

The DHCP server can automatically configure connected devices' TCP/IP settings and lease out an IP address from the available IP pool.&#x20;

To disable the DHCP server, you can select the checkbox of the **Ignore interface**.

<table><thead><tr><th width="117.4">Field</th><th width="102">Default</th><th>Description</th></tr></thead><tbody><tr><td>Start</td><td>100</td><td><p>The start of the DHCP IP pool.</p><p>For example, if the router’s LAN IP is 192.168.20.1 and the netmask is 255.255.255.0, a valid IP address should be in the range of [192.168.20.0…192.168.20.254]</p><p>* <em>192.168.20.255 is a particular unavailable address.</em></p></td></tr><tr><td>Limit</td><td>150</td><td><p>Define the IP addresses the DHCP server can lease out.</p><p>Continuing from the above example, if the start address is 192.168.20.100 and the server can lease out 150, available addresses will be from 192.168.20.100 to 192.168.20.249.</p></td></tr><tr><td>Lease time</td><td>12 hours</td><td><p>The duration of an IP lease. Leased-out addresses will expire after the specified period, and you must request a new DHCP lease.</p><p>If the device stays connected, its lease will be renewed after half of the specified amount of time passes.</p><p>For example, if the lease time is 12 hours, then every 6 hours, the device will send a request to the DHCP server asking to renew its lease.</p><p>The lease time can be set in hours (h) or minutes (m). The minimum time that can be specified is 2min (2m).</p></td></tr></tbody></table>

You can set up more configurations on the DHCP server under the **"Advanced Settings"** tab of the **"DHCP Server"** settings.

<table><thead><tr><th width="141.4">Field </th><th width="116">Default</th><th>Description</th></tr></thead><tbody><tr><td>Dynamic DHCP</td><td>Enable</td><td>Enables dynamic allocation of client addresses. If you disable it, you must input a static IP address on the connected devices.</td></tr><tr><td>Force</td><td>Disable</td><td><p>The DHCP force function ensures that the router will always start its DHCP server, even if another DHCP server is already running in the router’s network.</p><p>*** When connecting the router to another router via LAN cable, the outdoor router will turn to AP mode and obtain the IP address assigned from another router. You will no longer be able to access the router at 192.168.20.1.</p></td></tr><tr><td>IPv4 Netmask</td><td>NA</td><td>Overrides the LAN netmask, thus making the DHCP server think it’s serving a larger or smaller network than it is.</td></tr><tr><td>DHCP Options</td><td>NA</td><td>For example, you can assign an MTU value per DHCP with ‘26,1470’ or ‘option:mtu, 1470’. You can add more options by clicking the plus symbol (Services SMS gateway auto-reply plus symbol.PNG) next to the field.</td></tr></tbody></table>

### Physical Settings

There are three physical RJ45 ports on the EZR23T router. The "LAN" and "PoE & LAN" ports are bound to the logical port **eth0**.&#x20;

***

## **DHCP Leases**

To check the active DHCP clients, log in to the router admin and go to **"Network > DHCP & DNS."** Scroll down and find the section on **"Active DHCP Leases."**

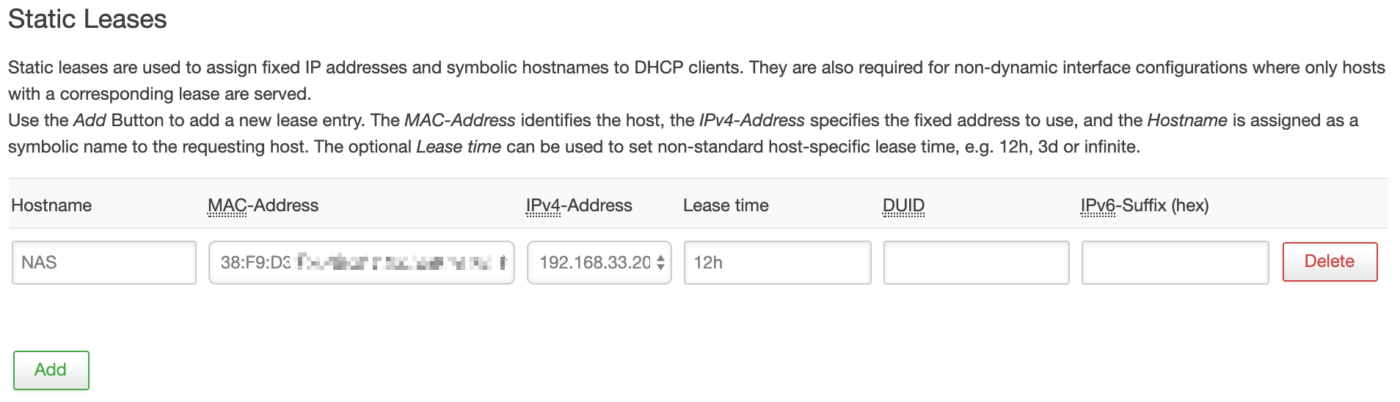
### **Static Leases**

Static IP leases reserve specific IP addresses to particular devices by binding them to their MAC address. It’s useful when having a stationary device connected to the network that needs to be reached frequently, such as a NAS, printer, camera, etc.

<figure><img src="https://www.outdoorrouter.com/wp-content/uploads/EZR3X_DHCP-DNS_Static-Leases-1400x402.png" alt=""><figcaption></figcaption></figure>

<table data-header-hidden><thead><tr><th width="176.95890410958907">Field Name</th><th width="93">Default Value</th><th>Description</th></tr></thead><tbody><tr><td>Hostname</td><td>NA</td><td>A custom name that describe be linked device</td></tr><tr><td>MAC Address</td><td>NA</td><td>MAC address of the linked device</td></tr><tr><td>IPv4 Address</td><td>NA</td><td>The desirable IP address that reserved for the specified device</td></tr></tbody></table>


# Mobile Modem

Monitor status and configure APN and Protocol on the Mobile interface.

## Mobile Status <a href="#mobile-status" id="mobile-status"></a>

### Homepage Device

Once logged into the router management interface, device status information is shown on the right side of the homepage, as shown below. This status information can help diagnose connectivity issues and monitor the real-time mobile network registration details.

<div align="left"><figure><img src="/files/OQiR1cRLzM9UbYmiJzE1" alt="" width="375"><figcaption><p>Modem Device Information &#x26; Mobile Connection Status</p></figcaption></figure></div>

**Mobile Modem** - Displays the model number of the cellular modem used in the router.\
**IMEI Number** - Unique identification number of the modem.

**SIM Card** - Shows which SIM card slot is activated.\
**SIM Status** - Indicates the SIM card installation and connection status.\
**Phone Number** - The mobile number associated with the inserted SIM card.

**Mobile Connection** - Indicates the current state of the mobile broadband connection.\
**Global Cell ID** - The ID of the cellular tower to which the modem is currently connected.\
**Operator ID** - Unique code identifying the mobile carrier network.

**Access Tech** - Shows the mobile technology the router is connected to.\
**Signal Quality** - Quantitative signal measurements such as RSRQ, RSRP, SNR, and RSSI values.

### Mobile Interface

To view real-time data usage and mobile IP address information, go to **"Network > Interfaces > Mobile."** Monitoring these parameters can be useful for checking mobile network registration status and diagnosing data connectivity issues. The Rx/Tx counters provide visibility into real-time usage, while the Uptime shows historical connection stability.

* **Protocol** - Indicates the mobile modem protocol used, e.g., Mobile Data, QMI, PPP.
* **Uptime** - Displays how long the current mobile data session has been connected.
* **Rx/Tx** - Shows the real-time inbound/outbound data traffic flowing through the modem. Note: this is not internet speed.
* **SIM** - Identifies which SIM card slot is active.
* **IPv4** - The mobile carrier assigns this mobile IP address for internet connectivity.

&#x20;

<figure><img src="/files/0mJfMXXbGC1NOVyP7an9" alt=""><figcaption><p>Mobile Interface Status</p></figcaption></figure>

### Stop & Restart

The Mobile interface can be manually **stopped** to disable the cellular data connection.&#x20;

If the modem needs to be power cycled, it is recommended to unplug the router's DC power adapter to force a hard reset rather than using the software reboot option. Disconnecting and reconnecting power will ensure the modem undergoes a full restart sequence when plugged back in to renew the mobile broadband connection. This may help resolve connectivity or registration issues if the modem is unstable.

***

## Mobile Settings <a href="#apn-settings" id="apn-settings"></a>

To change the Mobile modem settings, go to "***Network > Interfaces***" and click the "***Edit***" button on the **Mobile** interface after logging into the router.

### SIM Card Slot

**Active SIM Card** - Select between "Primary SIM 1" or "Secondary SIM 2" from the drop-down menu to choose which slot's SIM card to use. By default, the Primary SIM 1 slot is active.

**Auto Switch SIM** - If both SIM card slots have active SIMs inserted, the "Auto Switch SIM" function can be enabled to allow automatic failover between the connections. The router handles the SIM switchover internally, so no manual intervention is required when auto-failover takes place.

Check more about [Switch SIM cards](https://how.router.works/mobile/switch-sim-card).

<div align="left"><figure><img src="/files/zr1bc3dYd0t7xcRT6VB9" alt="" width="375"><figcaption><p>General Setup Mobile Interface - SIM Slot &#x26; Protocol</p></figcaption></figure></div>

### Mobile Protocol

Mobile protocol refers to communication technology and networking standards it uses to connect to cellular networks and transport data.&#x20;

The default mobile modem protocol on the EZR23T router is "**Mobile-Data**." It has integrated the below QMI and PPP protocol and automatically invokes the most adaptable protocols depending on the mobile networks.

If your carrier does not support the default Mobile-Data or QMI protocols, follow [Mobile Protocol Guidance](https://how.router.works/mobile/protocol) to change the modem's protocol to Cellular PPP.

### APN Settings

APN, or Access Point Name, is the gateway between the mobile network and external IP networks like the public Internet. Correct APN settings are vital for the modem to connect to the carrier properly.

Typically, the router's built-in default APN values are sufficient for mobile broadband connectivity. However, some providers or data plans may utilize different APNs that must be configured manually. If unable to establish a mobile connection, contact the carrier to obtain the appropriate APN details for the data plan.

Select either the "Primary SIM1" or "Secondary SIM2" tab, depending on which SIM card's APN is being configured. By default, Primary SIM1 is the active SIM card.

Enter the APN parameters provided by your mobile carrier. Refer to the APN chart below.

Click the "**Save & Apply**" button on the bottom when finished to save settings and reboot the mobile modem. It will take a few minutes to reconnect using the new APN.

<table><thead><tr><th width="219">Option</th><th>Decription</th></tr></thead><tbody><tr><td>APN</td><td>The APN gateway address</td></tr><tr><td>PIN</td><td>PIN code of SIM card <em>*Usually non-required</em></td></tr><tr><td>Username</td><td>PAP/CHAP Username</td></tr><tr><td>Password</td><td>PAP/CHAP Password</td></tr><tr><td>Authentication type</td><td>Usually use PAP</td></tr><tr><td>IP connection type</td><td>Usually use IPv4 only</td></tr></tbody></table>

<div align="left"><figure><img src="/files/BkhKsh7mPkAyqmg93uwC" alt="" width="375"><figcaption><p>Primary SIM1 - Mobile APN Settings</p></figcaption></figure></div>

Please refer to our [APN tutorial](https://how.router.works/mobile/apn) for more details on finding the appropriate Access Point Name settings for different mobile networks.


# WiFi Hotspots

The mobile router features an integrated WiFi access point, enabled by default, that allows connecting multiple wireless devices to access the mobile broadband connection.

## Wireless Overview

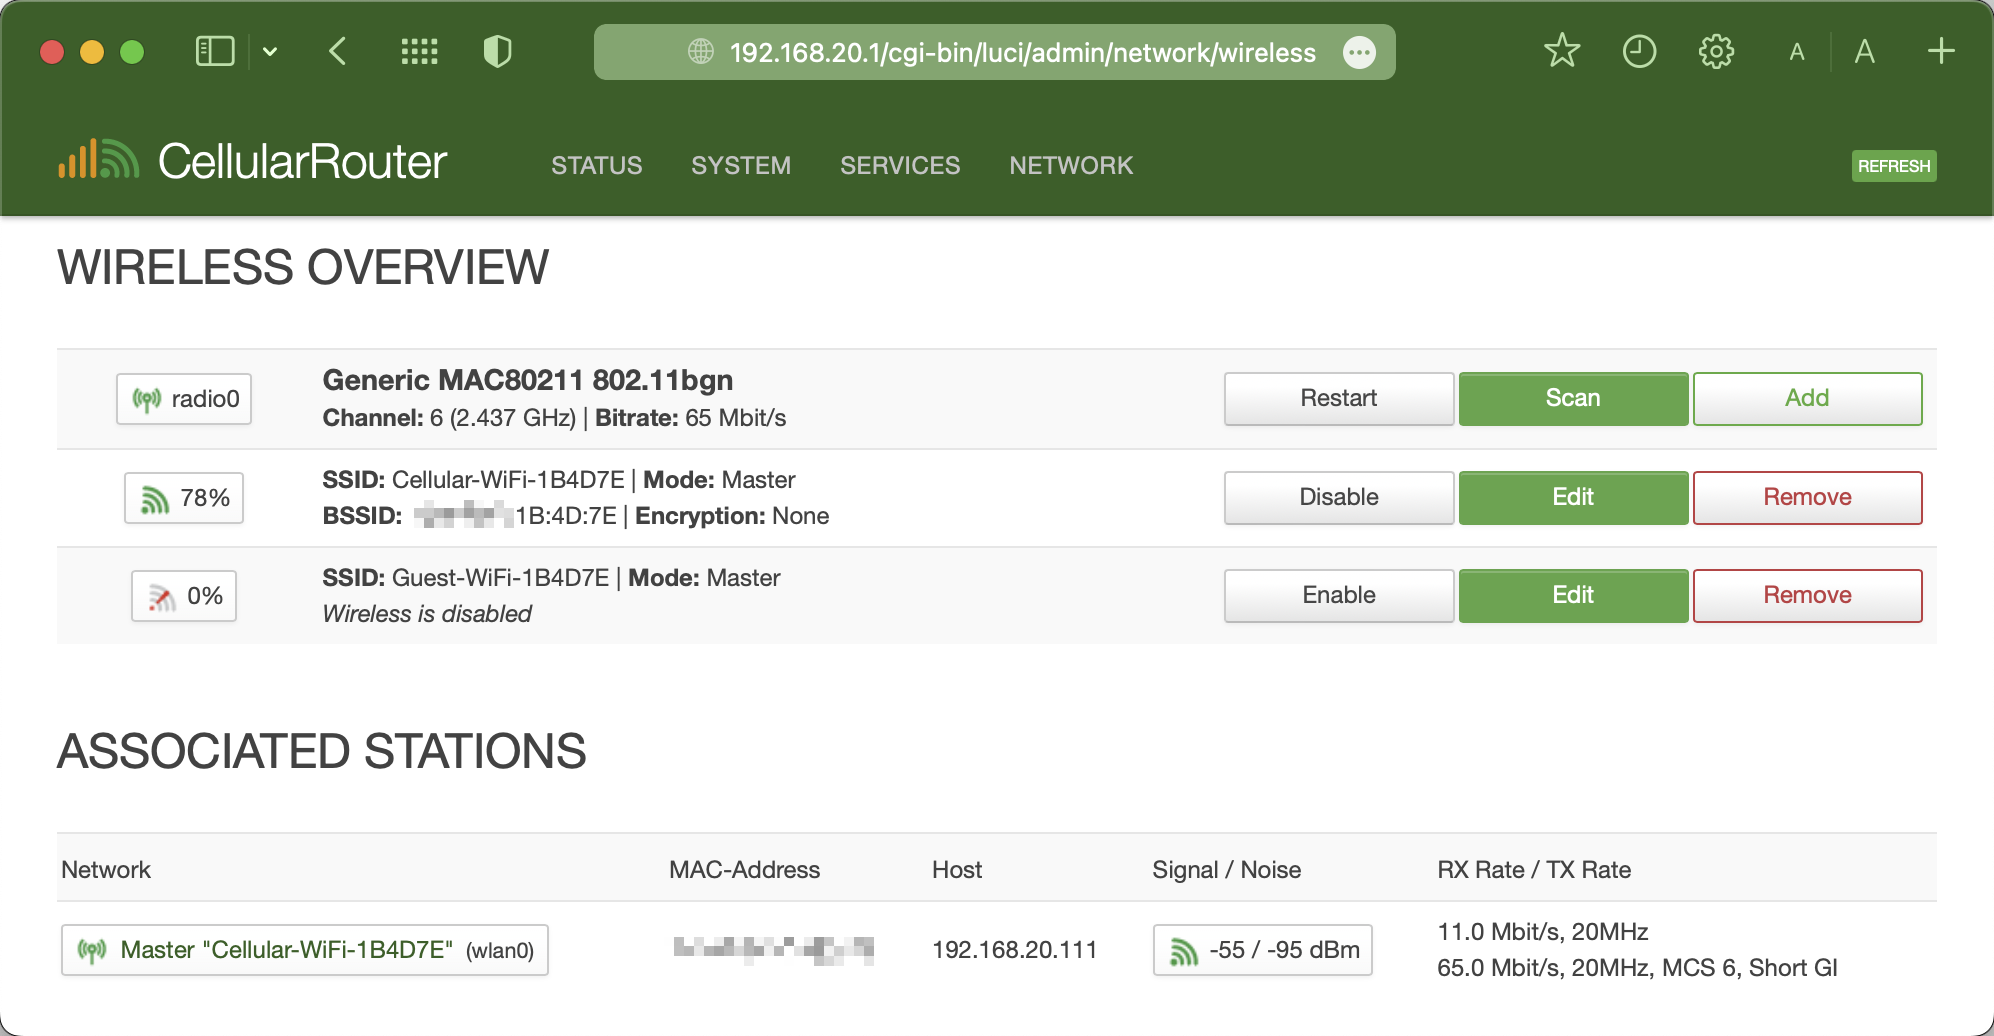
After logging into the router, go to "***Network > Wireless***." The **Wireless Overview** page lists the WiFi configuration section of the physical radio. You can configure the WiFi hotspots and set up a WiFi relay.

(radio0) **Generic MAC80211 802.11bgn** is the WiFi4 (2.4GHz) WiFi network

* **radio0** - Represents the physical wireless radio on the router
* **SSID | Mode: Master** - The primary WiFi (main & guest) hotspots hosted by the router
* **SSID | Mode: Client** - When configured, displays any relayed/repeated WiFi networks
* **Associated Stations** - Lists the currently active WiFi networks, client devices connected to them, and their status.

<div align="left"><figure><img src="/files/muFI6JCouwun00AwmmCM" alt="" width="375"><figcaption><p>Network > Wireless - WiFi Overview Page</p></figcaption></figure></div>

***

## WiFi Settings

Click the "**Edit**" button on the WiFi SSID row to enter the configure section.

**Cellular-WiFi-xxxxxx** is the main WiFi hotspot.\
**Guest-WiFi-xxxxxx** is the Guest WiFi hotspot isolated in a separate subnet.

*Note: "xxxxxx" indicates the MAC address of the WiFi AP module.*

### Device Configuration

#### Tab: General Setup

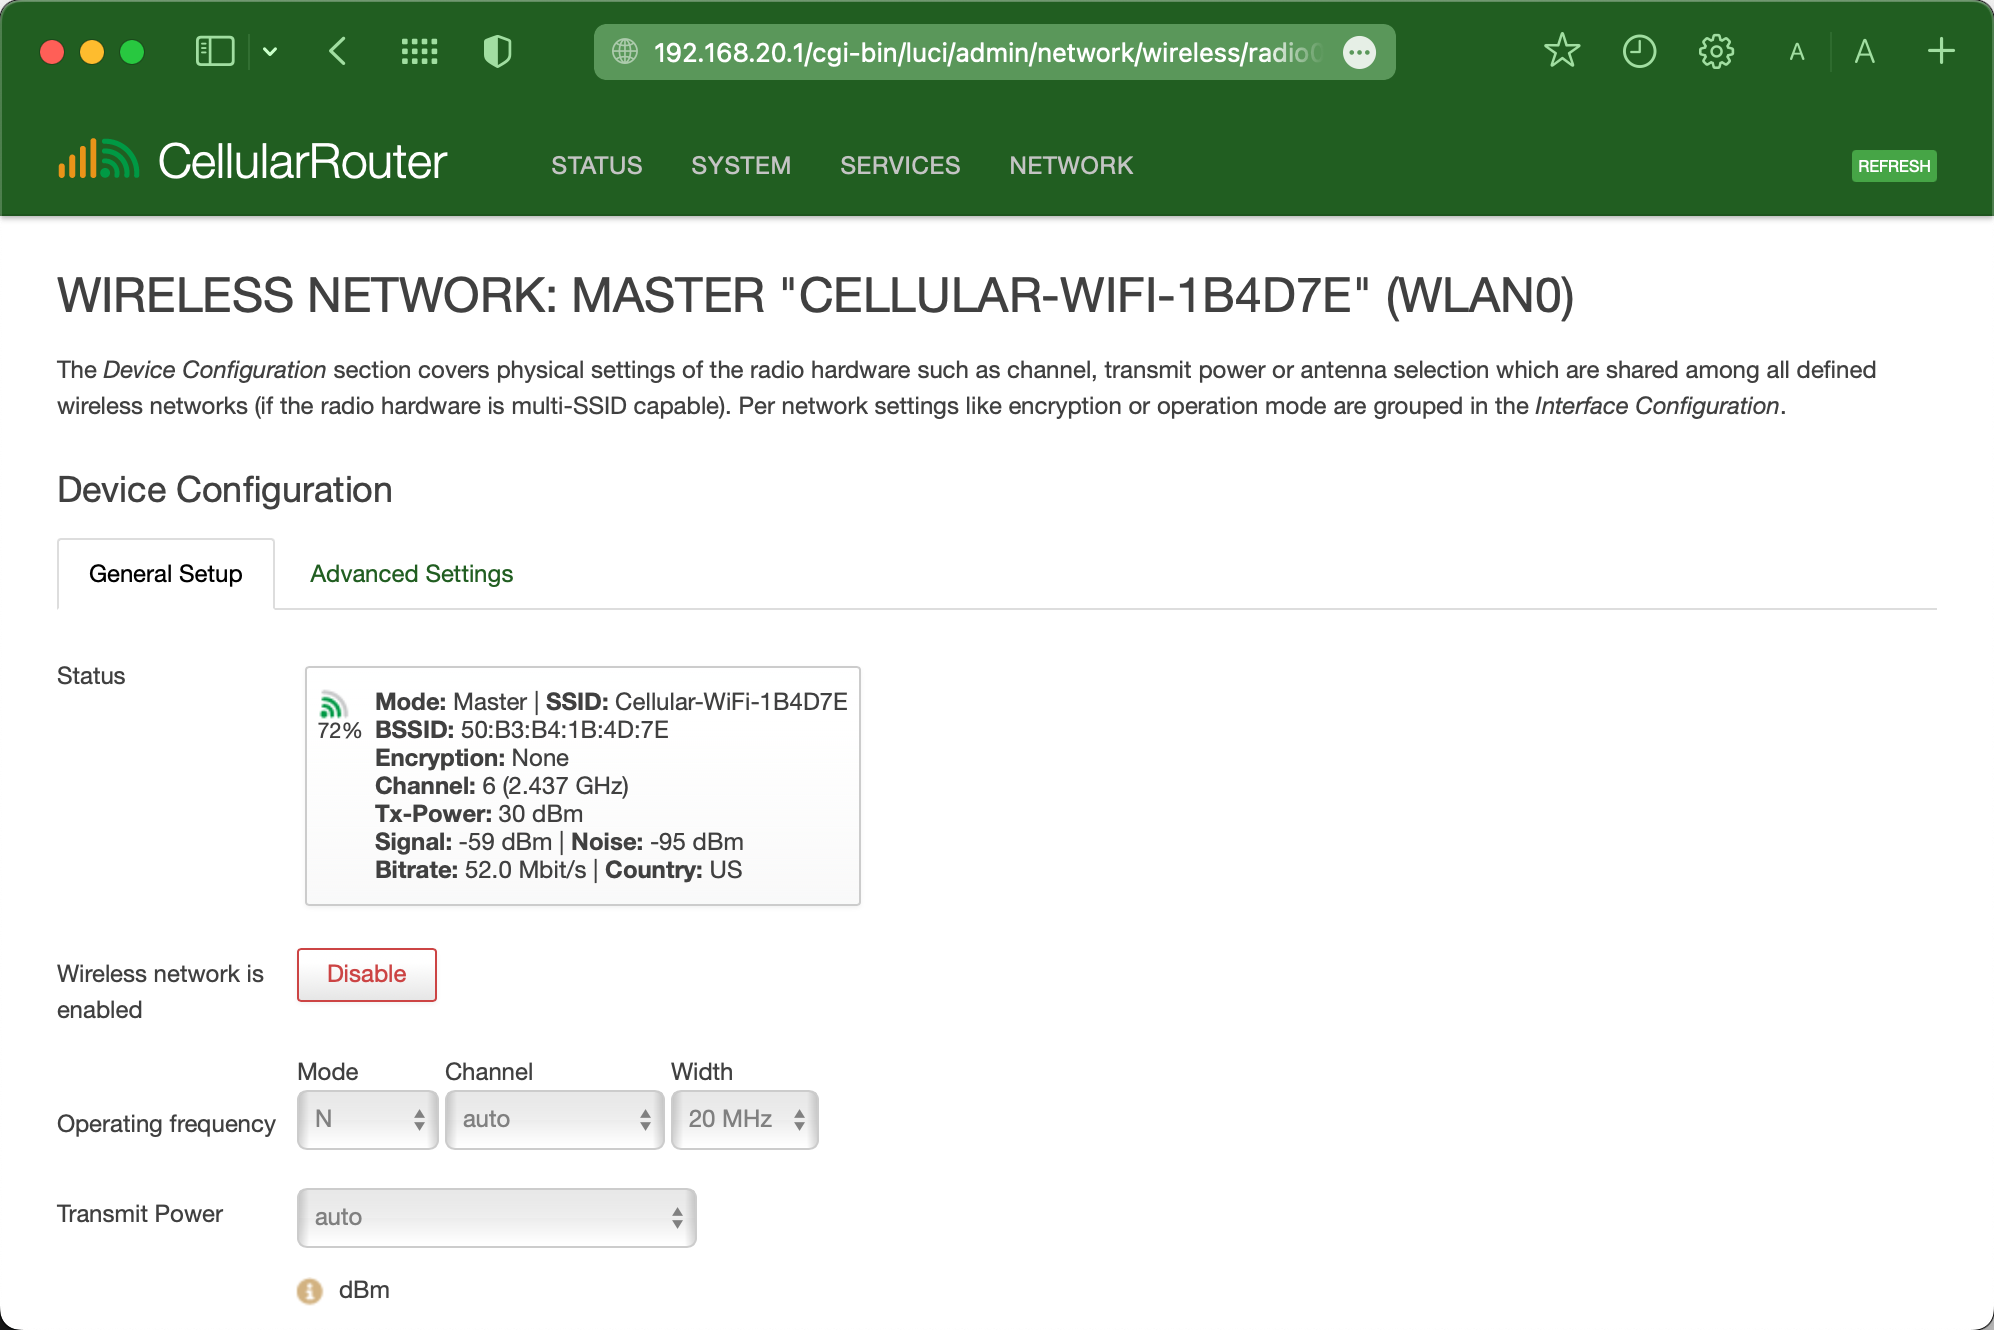
Monitor the WiFi hotspot status and configure general WiFi settings as below. Keeping the default settings is recommended to avoid conflicts.

* **Operating Mode** - Leave 802.11n standard (N mode) as default for maximum compatibility.
* **Channel** - Use the default Auto channel selection to let the router choose an unused channel. Or, if setting a manual channel, choose a lower channel <11 to ensure legacy device compatibility after setting the country code.
* **Operating Width** - Default 20MHz width instead of 40MHz helps avoid interference in dense WiFi environments.
* **Transmit Power** - Leave it in "Auto" mode to let the router adjust within regulatory limits. The max transmit power may be restricted below 21dBm depending on the country code for legal compliance.

<div align="left"><figure><img src="/files/QtiQuve6E955yiBA3uI1" alt="" width="375"><figcaption><p>WiFi General Setup - Mode Channel Width &#x26; Power</p></figcaption></figure></div>

#### **Tab: Advanced Settings**

Additional WiFi hotspot options can be configured under the "Advanced Settings" tab. These levers allow fine-tuning performance in challenging RF environments but require advanced wireless expertise. Misconfiguration can severely impact connectivity.

* **Country Code** - Select the appropriate country to ensure WiFi operates on legal frequencies and power levels.
* **Fragmentation Threshold** - Packet size before link layer fragmentation. Lower settings can help noisy links. 2346 bytes is generally recommended.
* **RTS/CTS Threshold** - Frame size threshold for RTS/CTS handshake. 2347 bytes is typically optimal.
* **Beacon Interval** - Configure the packet broadcast frequency. Lower times increase roaming support at the cost of throughput. Default 100ms is recommended.

### Wi-Fi SSID & Password

Scroll down to the "**Interface Configuration**" section to edit the WiFi SSID (WiFi hotspot name) and WiFi password.

#### Tab: General Setup

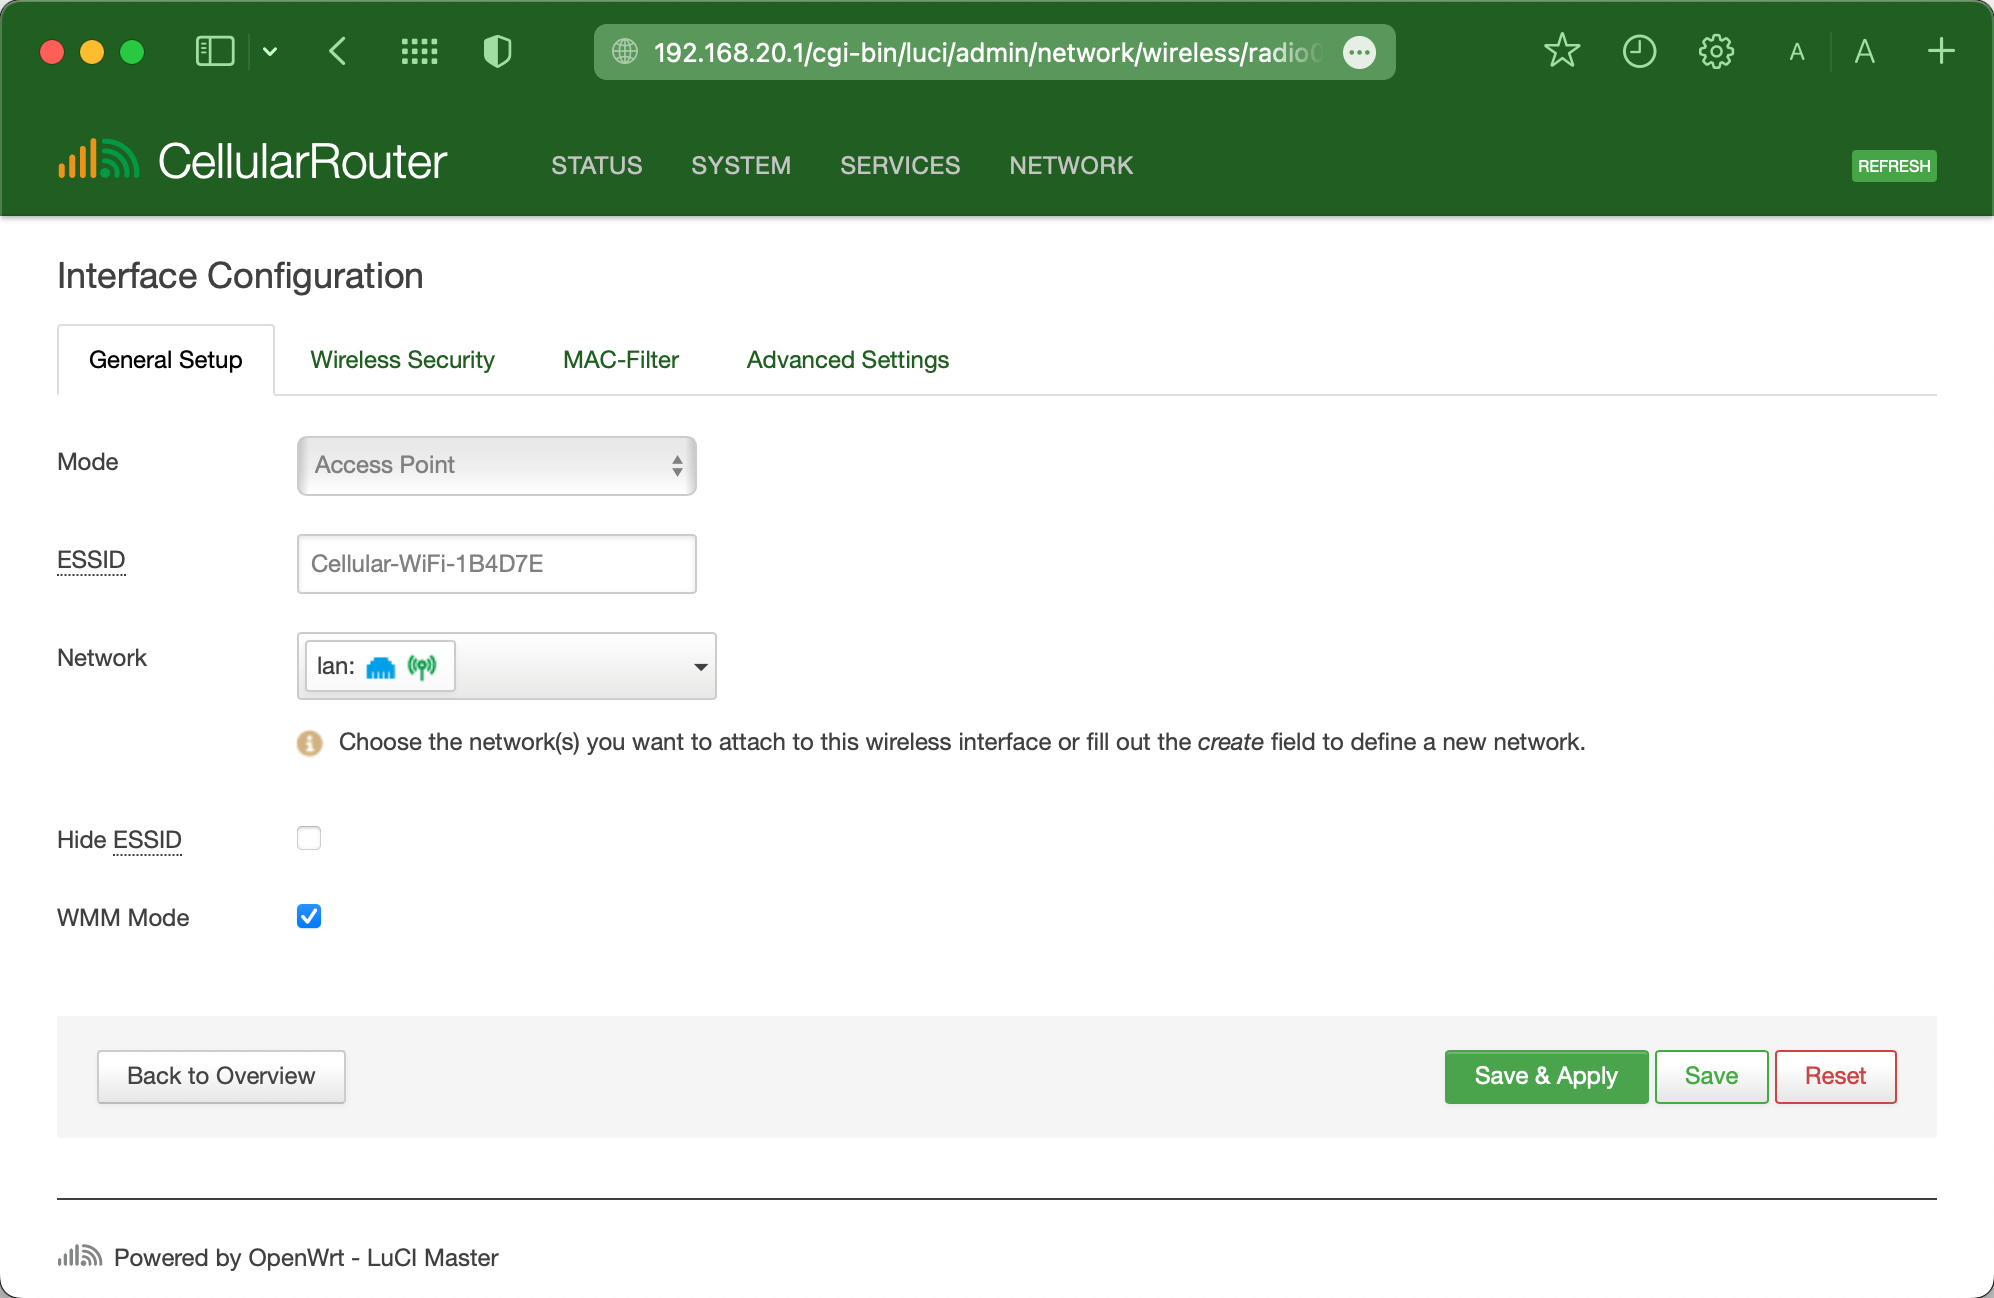
* **Mode** - Leave as Access Point
* **ESSID** - Enter the WiFi hotspot name (SSID) for the WiFi hotspot. It is recommended not to include spaces or special characters.
* **Network** - Leave as the default LAN network
* **Hide ESSID** - Enable this option to disable SSID broadcast.
* **WMM Mode** - WiFi Multimedia is an automated way of handling Quality of Service (QoS). Turn it off for more compatibility with legacy WiFi devices.

<div align="left"><figure><img src="/files/XNeH3dUo60uOjH46D8Yh" alt="" width="375"><figcaption><p>Wireless WiFi - ESSID Hotspot Name</p></figcaption></figure> <figure><img src="/files/LAE0fJmNyeXgBIDlEzu0" alt="" width="375"><figcaption><p>Wireless WiFi Security Encryption Method</p></figcaption></figure></div>

#### **Tab: Wireless Security**

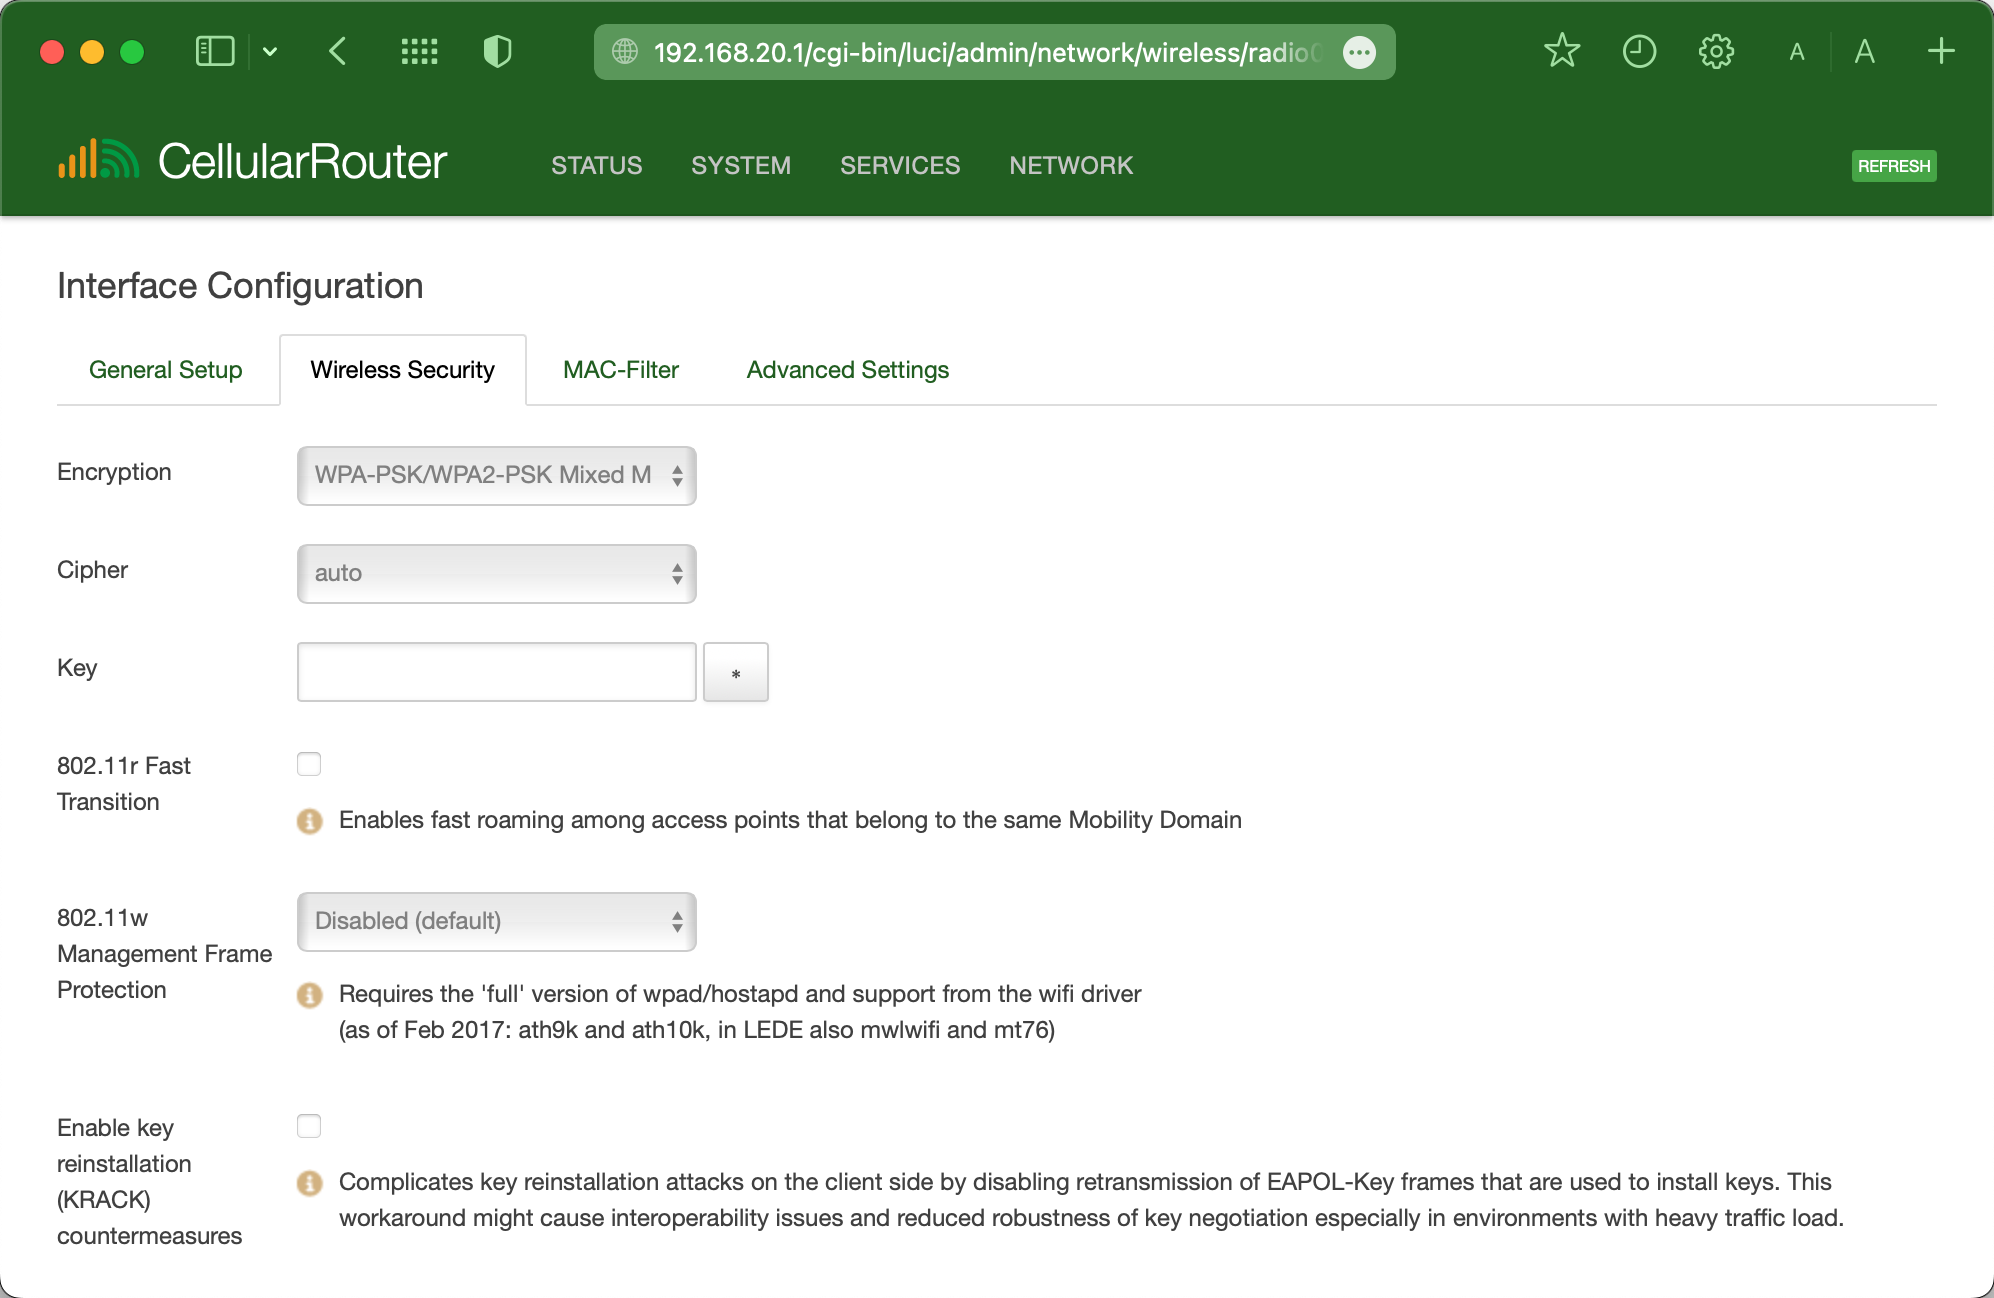
Next, click the "Wireless Security" tab to set up a WiFi password.

* **Encryption** - Select the encryption method. Using "WPA2-PSK" or "Mixed WPA/WPA2" encryption with a strong password is highly recommended to prevent unauthorized access.
* **Cipher** - The recommended default is "Auto."
* **Key** - Enter and confirm a password (at least eight characters) that clients will use to connect. Do not leave this option empty after choosing the "Encryption" method above.

Finally, click the **"Save & Apply"** button to apply the new settings. The WiFi hotspot will reboot in 2-3 minutes to apply the updated settings.&#x20;

Then, refresh network scans and reconnect your devices to the newly renamed/secured wireless network.

***

## WiFi Relay

The EZR23T router can be configured in WiFi client mode to connect to an existing WiFi hotspot as a client device. When joining another WiFi network, the router will obtain internet connectivity through that target wireless access point.

Check the [WiFi relay tutorial](https://how.router.works/net/wifi/relay).


# Firmware Upgrade

Performing the file-level backup, restore, reset, and firmware upgrade on the router.

## Backup & Restore

The router provides an easy way to back up and restore the configurations. We suggest backing up the router configurations before making changes.

### Backup Configurations

After accessing the router, navigate to ***"System > Backup / Flash Firmware > Actions: Backup."***\
Click the **"Generate Archive"** button to download the current router configuration archive.

*Note: Do not unzip the download archive file.*

### Restore Configurations

To restore previously saved router configurations from the local PC, please navigate to ***"System > Backup / Flash Firmware > Actions: Restore."*** \
Click the **"Choose File"** button to select the archive file.\
Click the **"Upload archive…"** button to upload the archive.

<div align="left"><figure><img src="https://2281776451-files.gitbook.io/~/files/v0/b/gitbook-x-prod.appspot.com/o/spaces%2FgV6nqomki285by8oRjoy%2Fuploads%2FIKFeoc8BwDNFlu9tcBHg%2FEZR24-Backup-Restore-4G-Router-Configurations.png?alt=media&#x26;token=319027f4-b4bf-4a55-87a7-b4494ea7a821" alt="" width="375"><figcaption><p>Backup and Restore the Router Settings</p></figcaption></figure></div>

***

## Flash Firmware

{% hint style="danger" %}
Do not turn off the power or disconnect from the power supply while flashing the firmware.
{% endhint %}

### Local Upgrade

A firmware upgrade will replace the entire current installation with a new version. Before upgrading the firmware, please download the backup file and download the correct firmware file. You can contact our sales team to get the latest firmware.

1. Navigate to ***"System > Backup / Flash Firmware > Actions: Flash new firmware image."***
2. Click the  **"Choose File"** button to select the firmware file. *\*Usually end with **\*.bin**.*
3. Click the **"Flash image..."** button to upload the firmware file.
4. Verify firmware image checksum and proceed.
5. The system indicator flashes while flashing the firmware.
6. Wait 3\~5 minutes until the router comes back online.

<div align="left"><figure><img src="https://2281776451-files.gitbook.io/~/files/v0/b/gitbook-x-prod.appspot.com/o/spaces%2FgV6nqomki285by8oRjoy%2Fuploads%2FVT3UyYJ59z4o2HO1tJGm%2FEZR24-Flash-New-4G-Router-Firmware-Image.png?alt=media&#x26;token=7bc3b7b8-11f8-492a-82c0-96131effe829" alt="" width="375"><figcaption><p>Flash Router Firmware</p></figcaption></figure></div>

{% hint style="info" %}

* Enable the "Keep Setting" checkbox will run a standard upgrade that automatically preserves much of the router configuration, like network settings, WiFi settings, the device hostname, etc.
* If disabled, the checkbox of "Keep Setting" the router **will not** automatically jump back to the front page after successfully flashing the firmware and rebooting. You need to re-access the router admin at <http://192.168.20.1/>.
  {% endhint %}

### Online Upgrade

You can also upgrade the firmware from the cloud server.

1. Navigate to ***"System > Backup / Flash Firmware > Actions: Online Upgrade."***
2. Click the **"Check New Version"** button.&#x20;
3. It will start to check upgraded firmware and download the updated firmware file to the router's temporary memory space.&#x20;
4. Then, it will automatically run a standard upgrade and keep the previous configurations.
5. Wait 3\~5 minutes until the router comes back online.


# Recovery

Fix the issues on the Internet and wireless networks and rescue the router from misconfigurations.

## Reboot Router

The router has a Linux-based operating system like a regular computer. Rebooting the router can solve mysterious problems, fix Internet connectivity issues, and improve security.

The Internet provider assigns a temporary IP address, which can be changed during a timeout. If the router misses the change, the Internet connection might become slow. The same can happen if too many devices are connected to the router. For example, the routers found channels with less traffic and increased performance speeds while rebooting.&#x20;

#### Soft Reboot

After accessing the router, go to "System > Reboot" for a **soft reboot**.

#### Hard Reboot

To do a **hard reboot**, please unplug the power supply, wait a few seconds, and connect again.

{% hint style="danger" %}
Do not disconnect from the power supply while flashing firmware and resetting the router.
{% endhint %}

##

## Factory Reset

After a factory reset, the router will erase configurations and return to the factory default settings.

### Soft Reset&#x20;

1. After accessing the router, go to ***"System > Backup / Flash Firmware > Actions: Restore."***
2. Click the red "Perform Reset" button and the "*Confirm"* button on the *pop-up* window.&#x20;
3. The router will go to the System - Erasing page. The system indicator flashes while resetting.
4. Wait 3-5 minutes until the router completes the resetting progress and reboots.

### Hard Reset

The router has a *Reset* button between the DC socket and the WAN port.&#x20;

1. Power on the router and wait until the router successfully boots up. The System indicator stops flashing, and the WiFi indicator turns on.
2. Press and keep pushing the Reset button for 5 seconds.
3. Release the *Reset* button.
4. The router starts resetting the firmware, and the system indicator flashes.
5. Wait 3-5 minutes until the router completes the resetting progress and reboots.

{% hint style="danger" %}

* Do not turn off the power or disconnect from the power supply while resetting the router.&#x20;
* Before disconnecting from the power source, ensure the router completes the resetting progress and can access the router's admin page.
  {% endhint %}


# Troubleshooting

The collection of the problem elimination process.

## Changing Password

#### **Wi-Fi Password**

The default Wi-Fi network is turned on and without the encryption password. You can refer to [Wi-Fi SSID & Password](/firmware/wifi-hotspots#wi-fi-ssid-and-password) to configure the encryption type and password to secure your wireless networks.

#### **Router Password**

The router is non-encrypted on default settings, with no password. To [change the router password](/firmware/system-admin#administration), log into the router and go to "System > Administration."&#x20;

## Forget Router Password

The router has no password on default settings. If you have changed the router password and forgotten it, please [reset the router](/firmware/recovery#hard-reset) to default settings. It will erase the previous configurations, and you can log in to the router again with the above default password.

## Disable Wi-Fi Network

To disable the Wi-Fi network, go to "Network > Wireless" and click the "Disable" button on the target WiFi hotspot you want to disable.

## Can Not Find Wi-Fi Hotspot

Please check the below indicators on the router.

**System Indicator**

* If the system indicator is **off**, please check the connections of the power adapter.
* If the system indicator is flashing, please wait 2-3 minutes until the router boots up.

**Wi-Fi Indicator** - When the system indicator stays green, check the Wi-Fi indicator.

* If the Wi-Fi indicator stays green, the Wi-Fi network has been enabled, but no data is streaming on the Wi-Fi network.&#x20;
  * You can try to search for the Wi-Fi hotspot. Remember, you might have changed the Wi-Fi SSID name once before.
  * If you enabled the "Hide ESSID" checkbox, please manually input the device's Wi-Fi SSID name and password.
* If the Wi-Fi indicator is off and the Wi-Fi network has been disabled, please access the router with the LAN cable connection and enable the Wi-Fi network. If the LAN cable connection does not work, reset the router to default settings.

## Reset the Router

You can use either a soft reset or hard reset to erase the configurations on the router and go back to the factory settings.

‌ The suggested way is a [**soft reset**](/firmware/recovery#soft-reset). If unable to access the router, please do a [**hard reset**](/firmware/recovery#hard-reset) by clicking the reset button for 5 seconds when the router is turned on.

***

For any additional questions not covered in this manual, please check the [Knowledge Base](https://www.outdoorrouter.xyz/), [How.Router.Works](https://how.router.works/), or [contact OutdoorRouter](https://www.outdoorrouter.com/contacts) directly.